
Keycap Guide
How to Clean Keycaps – Step-by-Step Guide for Any Keyboard
A dirty set of keycaps is not only aesthetically unpleasing but also directly affects your typing feel and the durability of your switches. The good news is, “revamping” your keyboard is not difficult at all. This article will provide you with a detailed, step-by-step guide on how to clean keycaps, from quick daily cleaning methods to a thorough “deep clean” process. We will show you how to safely remove keycaps, soak them correctly, and dry them so your keyboard looks as good as new.
Why Is Regular Keycap Cleaning Necessary?
You might not realize it, but your keyboard is one of the dirtiest items on your desk.
Dirt, food crumbs, hair, and dead skin cells constantly fall and get trapped between the keys. Combined with sweat and oil from your fingertips, your keycaps become an ideal environment for bacteria growth.
- Affects Typing Feel: Accumulated dirt can jam the switches, causing a “sandy” or less smooth typing sensation.
- Reduces Durability: Dust and liquids can seep into the Printed Circuit Board (PCB), causing flickering or permanent damage.
- Aesthetic Loss: Oily, yellowed keycaps (especially ABS keycaps) reduce the value and beauty of your expensive custom keyboard.
Regular keycap cleaning not only helps your keyboard look new but also improves your typing experience and significantly extends the lifespan of your device.

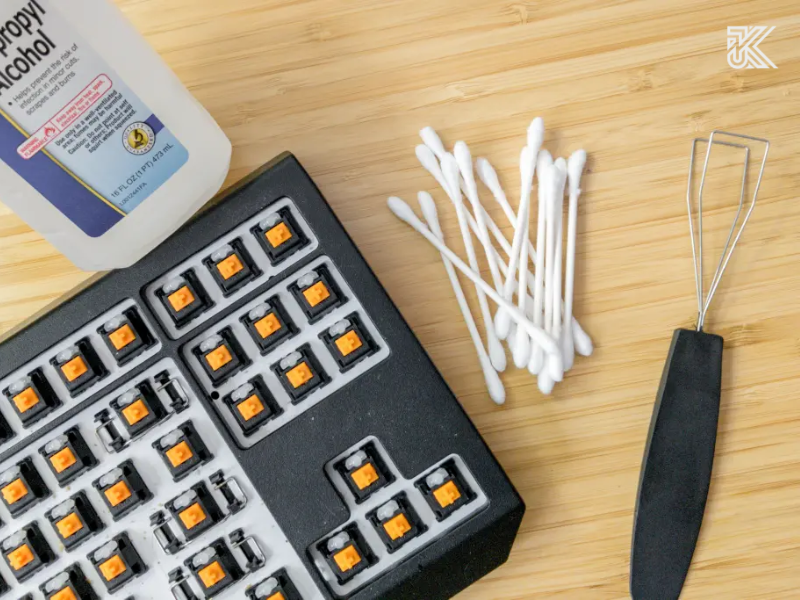
Preparing Your Keycap Cleaning Tools
Before you start, make sure you have all your “gear” ready. Depending on the level of cleanliness you desire, we will divide the tools into two groups.
Basic Tools (Quick Cleaning)
- Microfiber cloth
- Soft brush or small sweeping brush (for dusting)
- Cotton swabs
- Air blower or compressed air can
- Mini keyboard vacuum cleaner (optional)
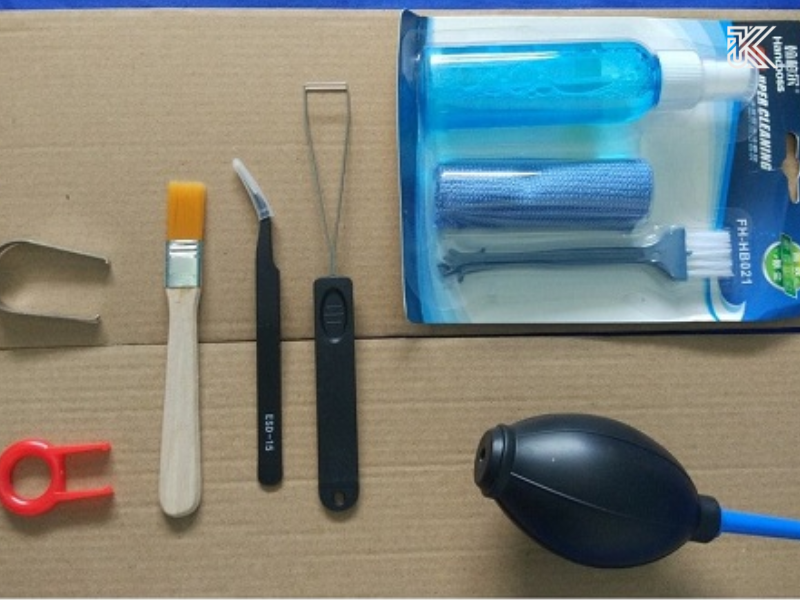
Advanced Tools (Deep Cleaning)
- Keycap Puller: A must-have. You should use a wire puller instead of a plastic clip-style one to avoid scratching the edges of the keycaps.
- 2 small bowls or containers.
- Hand soap, dish soap (mild type) OR denture cleaning tablets (very effective for PBT keycaps).
- Warm water (do not use hot water).
- Ultrasonic cleaner: This is the “ultimate weapon” if you want sparkling clean keycaps, but it is not mandatory.
Note: Absolutely avoid harsh cleaning agents such as high-concentration alcohol (above 70%), acetone, or bleach (Javel), as they can damage the plastic surface, fade key legends, or make the keycaps brittle (especially ABS plastic).
How to Remove Keycaps Safely
This is the step many beginners worry about most. Don’t worry, just be careful!
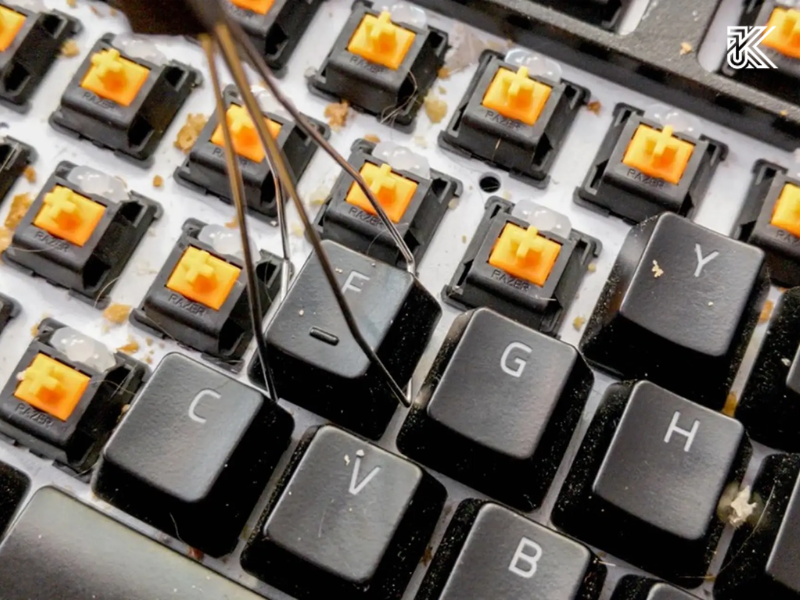
- Use a Keycap Puller: Position the keycap puller (wire type) so that the two wire ends hook onto two opposite corners of the keycap.
- Pull Straight Up: Hold the keyboard with one hand, and pull the keycap puller straight up with the other hand decisively but gently. Avoid twisting or wiggling, as this can break the switch stem.
- Large Keys (Stabilizer) Note: Keys like the Spacebar, Enter, Shift, and Backspace have an additional balancing bar (stabilizer). When removing these keys, you need to pull more gently and may need to gently wiggle them side-to-side for them to slowly disengage. Observe carefully how they are attached for easier reinstallation.
Tip: If you have an expensive custom keycap set, try removing a less-used key first (e.g., the Scroll Lock key) to “get the feel” before removing the main keys.
The 6-Step Detailed Keycap Cleaning Process
This is the most effective deep-cleaning method for keycaps.
Step 1: Unplug the Keyboard and Take a Layout Photo
This step is crucial! Before removing any keys, unplug the USB cable from your keyboard and computer.
Then, use your phone to take a photo of your entire keyboard layout. This will save you from the nightmare of “misplaced keys” after cleaning, especially if you use a non-standard layout or artisan keycaps.
Step 2: Remove All Keycaps
Using the keycap puller, gently remove all the keycaps. You can place them into one of the two prepared bowls.
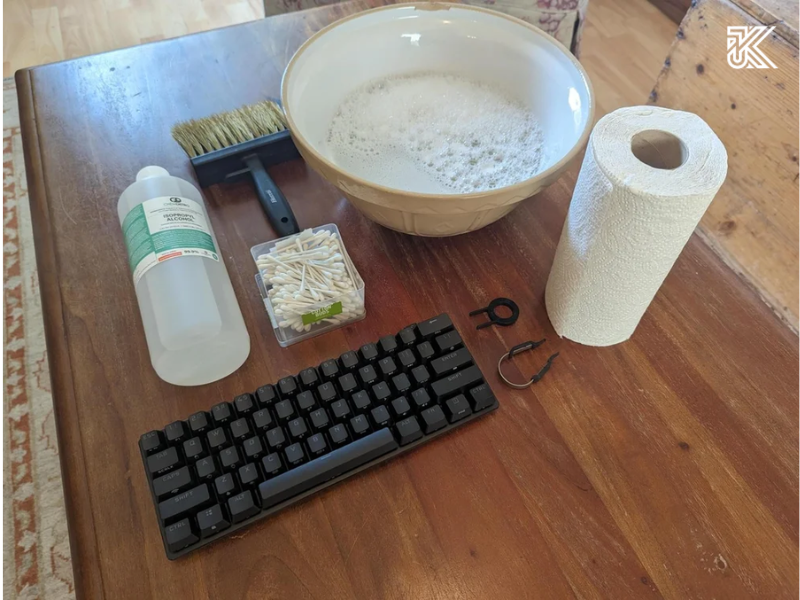
Step 3: Soak the Keycaps
- Pour warm water (not too hot) into the bowl containing the keycaps.
- Add a few drops of mild dish soap and stir well.
- Let the keycaps soak in this solution for about 30 to 60 minutes.
Expert Tip: If you have stubborn stains on PBT keycaps (not ABS), try using 1-2 denture cleaning tablets (like Polident). They have strong cleaning power without damaging PBT plastic. Do not use this method for ABS keycaps.
Step 4: Rinse and Dry Keycaps Correctly
- After soaking, vigorously stir the keycaps in the bowl or gently scrub each one with a soft brush if needed.
- Pour the keycaps into a colander and rinse them completely under cool running water until all soap residue is gone.
- Shake off excess water. Lay the keycaps out on a clean microfiber towel.
- Let the keycaps air dry naturally overnight or for at least 12 hours.
Absolute Don’t: Never use a hairdryer (especially on hot settings) or dry the keycaps under direct, intense sunlight. High heat can cause the keycaps to warp or deform permanently.
Step 5: Clean the Keyboard Surface (Deep Clean Keyboard)
While waiting for the keycaps to dry, this is the perfect time to “spring clean” the keyboard body.
- Turn the keyboard upside down and gently tap it to shake out dirt and crumbs.
- Use an air blower or compressed air to clear dust trapped between the switches.
- Use a cotton swab dipped in a small amount of isopropyl alcohol (70%) to wipe the crevices clean.
- Use a damp (not wet) microfiber cloth to wipe down the entire keyboard case.
Step 6: Reinstall the Keycaps
When you are 100% sure the keycaps are completely dry inside and out, open the layout photo you took in Step 1. Carefully place each keycap back onto the correct switch. Press gently until the keycap snaps onto the stem. Pay attention to correctly reinstalling the keys with stabilizers.
Quick Cleaning Without Removing Keycaps
If you don’t have much time or your keyboard isn’t too dirty, this “quick cleaning” method (recommended 1-2 times/week) will be very helpful.
- Unplug the keyboard cable.
- Use an air blower or compressed air to blow away dust between the keys.
- Use a mini keyboard vacuum cleaner (if available).
- Take a microfiber cloth, lightly dampen it (you can use a mild disinfectant solution), and thoroughly wipe the surface of all keycaps.
- Use cotton swabs to clean the narrow gaps between the key rows.
This method helps with daily hygiene but cannot replace a deep clean every 2-3 months.
Key Do’s and Don’ts
| Do’s 👍 | Don’ts 👎 |
| Deep clean regularly (every 2-3 months). | Do not use boiling water or a hot hairdryer. |
| Use mild soap (like dish soap). | Do not use harsh chemicals (bleach, acetone). |
| Use a wire keycap puller. | Do not use high-concentration alcohol (over 70%) to wipe keycaps. |
| Always take a photo of the layout before removing. | Do not dry keycaps under direct, intense sunlight. |
| Allow keycaps to dry completely (at least 12h) before reinstalling. | Do not plug in the keyboard while there is any moisture present. |
Suggested Tools for Effective Keyboard Cleaning
If you are a true enthusiast, consider investing in:
- Ultrasonic Cleaner: Just place keycaps, water, and a drop of soap inside, and the machine will use ultrasonic waves to dislodge all dirt, even in the most hidden corners. This is the most effective and effortless way to clean keycaps.
- Professional Cleaning Kit: Usually includes various brushes, cloths, a keycap puller, and an air blower, all in one convenient storage box.
Frequently Asked Questions (FAQ)
How often should I clean my keycaps?
For quick cleaning (surface wipe), you should do it 1-2 times/week. For deep cleaning (removing and soaking keycaps), the ideal frequency is about every 3-6 months, depending on your usage level and work environment.
Can I use alcohol to wipe keycaps?
Be cautious. You can use 70% Isopropyl Alcohol (IPA) for a quick surface disinfection. However, never use high-concentration alcohol (above 70%) or soak keycaps in alcohol. It can damage the UV coating, fade key legends, or make the plastic brittle, especially keycaps made from ABS plastic.
Do ABS and PBT keycaps need different cleaning?
The process is essentially the same. However, ABS keycaps are more prone to shine and yellowing over time, and they are more sensitive to harsh chemicals. PBT keycaps are more durable, more resistant to shine, and can tolerate slightly stronger mild cleaners (like denture cleaning tablets).
Keeping your keycaps clean is not just a matter of aesthetics. It is a crucial part of keyboard maintenance, helping to preserve that satisfying typing feel and protecting your investment. By following the step-by-step instructions in this article, you can easily “revive” your keycap set, making them look clean and fresh as the first day. Don’t hesitate to set aside an afternoon to take care of your keyboard companion.